
A How-To Guide for New Facebook Business Pages
Several months after Facebook first started rolling out Timeline to the public, the social network has formally announced Timeline's expansion to brand- and business-focused pages.
Timeline for Pages has a number of features similar to those of your personal Timeline, so making the switch shouldn't be difficult. There are, however, a few new features unique to Facebook Pages that are designed to help you better manage the account and capitalize on customer engagement. Here's what you need to know.This is the first major redesign to Pages since February 2011. Page owners will have until March 30 to update their pages to the new design; after that, Facebook will switch your page automatically.
 Timeline for Pages: Getting Started
When you log into your brand or business Facebook Page, you'll notice a pop-up banner announcing the new Pages. From here, you can preview what your Page will look like with the new design, take a tour of the features and even publish the new design. You'll likely want to update your Page before pushing it live. (Remember: you have only until March 30 to do so.)
Timeline for Pages: Your Cover Photo
Much like on your personal Timeline, you'll have the option to upload a landscape-oriented cover photo to your Page. Facebook says the image must be at least 399 pixels wide, though it suggests 851x351 pixels.
"The cover photo is one of the best ways to introduce people to your page. First impressions are key and that cover photo is front and center," says Alison Zarrella, author of The Facebook Marketing Book. "It's also important to remember that as this is the way your Page is introduced to new fans, the cover photo is not the place to be selling to them."
To prevent cover photos from looking like banner ads, Facebook will not allow cover photos that contain the following: prices or purchase information such as "40% off" or "Download it at our website;" contact info such as Web addresses, email addresses, mailing addresses or other information intended for your Page's "About" section; references to Facebook features such as "Like this Page" or "Share" this page; and calls to action, such as "Get it now" or "Tell your friends."
Your Page's profile picture may also need to be adjusted. Facebook suggests you use a square image that is at least 180 pixels wide.
Timeline for Pages: Features
Highlight what's important: Similar to highlighting important stories on your personal Timeline, you can now feature important brand and business posts by clicking the star icon, which will make it wider. You can also use the pencil icon to pin it to the top of your Page, hide it or delete it entirely.
Pinned posts are Page posts that admins choose to display prominently at the top of their Facebook Page. It will always appear on the top-left of the Page's Timeline and is designated by a flag on its top-right corner. Pinned posts will stay there for seven days; after that, it will return to the date it was posted on the Page's Timeline. Posts from people who like a Page are not eligible to be pinned--only Page admins can pin posts created by the Page.
"When a page needs to broadcast information about a recall, change in hours or weather issues, the pinning feature will be really helpful," Zarrella says. "I could see government agencies getting more use out of Facebook with the launch of that feature as a means of communicating critical information."
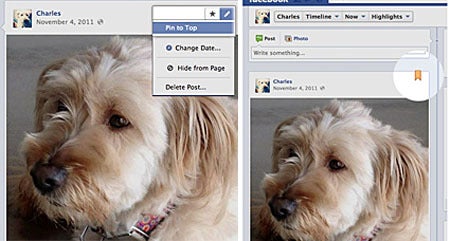
To pin a post to the top of your Facebook Page, click the pencil icon in the upper-right corner of your Page's post, then select "Pin to Top."
Reordering icons: Below your cover photo are icons that link to your photos, likes and apps. By default, your photos will appear in the first spot, but you can change the order of everything else. Facebook will allow you to show a maximum of 12 apps, so think about which ones you want to feature.

To reorder the apps that appear below the cover photo, expand the apps menu by clicking the drop-down menu to the right of your Page's apps. Hover over the position where you'd like to put an app and click the pencil icon that appears. Then, choose the app you'd like to swap into that spot from the menu.
Milestones: In your personal Timeline, you have the option to add "Life Events" to fill out important moments. Pages, too, have this feature, but Facebook calls them "Milestones," or key moments you've decided to highlight on your page. Milestones are automatically expanded to widescreen and are visible to everyone visiting your Page.
To add a Milestone, click the book icon in the sharing tool at the top of your Page's Timeline. Then, add a headline, location, date, details and photo, if you wish, and click Save. You can also click the + icon from anywhere on your Page's Timeline to post a milestone or other type of story to a particular date. Milestone photos display at 843x403 pixels, and January 1, 1800, is the earliest date a milestone can have.
Activity Log: Also, similar to your personal Activity Log, the Facebook Pages version lets you review the history of your Page and change the settings of individual posts. Only Page admins can see the activity log. To find the Activity Log, visit your Admin Panel and select "Use Activity Log" from the "Manage" drop-down menu.
If you're updating your Page, you can drill down to see all your Page's stories organized by date, star posts from here, hide and delete posts, change the date and report and remove spam posted on your page.
Timeline for Pages: New Admin Panel
The "Admin Panel" is where you can respond to people using your Page and gauge how your Page is performing. You can find the Admin Panel by clicking the link above the date selector in the upper-right corner of your Page. To close it, click the "Hide" button in the top-right corner.
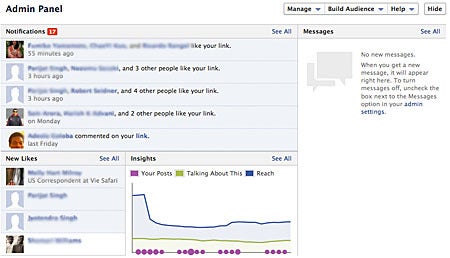
In your Admin Page, you can also view notifications, respond to messages, view your Page insights, access your activity log to curate content on your Page, and access the Edit menu to make changes to your Page's settings.
0 comments:
Post a Comment